Three.js的阴影系统提供了逼真的光影效果,但需要正确配置和优化才能获得最佳性能。以下是详细的配置与优化指南:
javascript
// 启用渲染器阴影
renderer.shadowMap.enabled = true;
renderer.shadowMap.type = THREE.PCFSoftShadowMap; // 推荐类型

// 设置光源投射阴影
const directionalLight = new THREE.DirectionalLight(0xffffff, 1);
directionalLight.castShadow = true;
scene.add(directionalLight);

// 设置物体接收/投射阴影
const cube = new THREE.Mesh(geometry, material);
cube.castShadow = true;     // 物体投射阴影
cube.receiveShadow = true;  // 物体接收阴影
scene.add(cube);
javascript
const directionalLight = new THREE.DirectionalLight(0xffffff, 1);
directionalLight.position.set(5, 10, 5);
directionalLight.castShadow = true;

// 阴影相机参数
directionalLight.shadow.camera.left = -20;
directionalLight.shadow.camera.right = 20;
directionalLight.shadow.camera.top = 20;
directionalLight.shadow.camera.bottom = -20;
directionalLight.shadow.camera.near = 0.1;
directionalLight.shadow.camera.far = 100;

// 阴影贴图分辨率
directionalLight.shadow.mapSize.width = 2048;
directionalLight.shadow.mapSize.height = 2048;

// 阴影参数优化
directionalLight.shadow.radius = 1; // 仅PCFSoftShadowMap有效
directionalLight.shadow.bias = -0.0001; // 消除阴影失真javascript
const spotLight = new THREE.SpotLight(0xffffff, 1);
spotLight.position.set(0, 10, 0);
spotLight.castShadow = true;

// 聚光灯特定参数
spotLight.angle = Math.PI / 6; // 30度锥角
spotLight.penumbra = 0.1;     // 边缘模糊
spotLight.decay = 1;          // 衰减

spotLight.shadow.mapSize.width = 1024;
spotLight.shadow.mapSize.height = 1024;
spotLight.shadow.camera.fov = 30;
spotLight.shadow.camera.near = 0.5;
spotLight.shadow.camera.far = 50;javascript
const pointLight = new THREE.PointLight(0xffffff, 1, 100);
pointLight.position.set(0, 10, 0);
pointLight.castShadow = true;

pointLight.shadow.mapSize.width = 512;
pointLight.shadow.mapSize.height = 512;
pointLight.shadow.camera.near = 0.1;
pointLight.shadow.camera.far = 50;javascript
// 根据物体距离动态调整分辨率
function updateShadowResolution(camera, light) {
    const distance = camera.position.distanceTo(light.position);

    if (distance < 20) {
        light.shadow.mapSize.width = 2048;
        light.shadow.mapSize.height = 2048;
    } else if (distance < 50) {
        light.shadow.mapSize.width = 1024;
        light.shadow.mapSize.height = 1024;
    } else {
        light.shadow.mapSize.width = 512;
        light.shadow.mapSize.height = 512;
    }

    // 需要重新生成阴影贴图
    light.shadow.map?.dispose();
    light.shadow.map = null;
}javascript
// 只渲染相机视野内的阴影
function updateShadowCamera(light, camera) {
    const shadowCamera = light.shadow.camera;

    // 根据主相机视锥体调整阴影相机
    shadowCamera.far = Math.min(light.shadow.camera.far, camera.far);

    // 更新投影矩阵
    shadowCamera.updateProjectionMatrix();
}javascript
// 使用Layer系统控制哪些物体投射阴影
const shadowLayer = new THREE.Layers();
shadowLayer.set(1);

// 设置光源只影响特定层级
directionalLight.layers.enable(1);

// 重要物体:高精度阴影
importantObject.castShadow = true;
importantObject.layers.enable(1);

// 次要物体:低精度或无阴影
secondaryObject.castShadow = false;
secondaryObject.receiveShadow = true;javascript
class ShadowCache {
    constructor() {
        this.cache = new Map();
    }

    getShadowMap(object, light) {
        const key = `${object.uuid}-${light.uuid}`;
        if (!this.cache.has(key)) {
            // 创建并缓存阴影贴图
            const shadowMap = this.createShadowMap(object, light);
            this.cache.set(key, shadowMap);
        }
        return this.cache.get(key);
    }

    createShadowMap(object, light) {
        // 创建离屏渲染器生成阴影贴图
        const shadowRenderer = new THREE.WebGLRenderer({
            alpha: true,
            antialias: false
        });
        // ... 配置并渲染阴影
        return shadowTexture;
    }
}javascript
// 只在需要时更新阴影
let shadowUpdateNeeded = false;

function checkShadowUpdate(objects, camera) {
    shadowUpdateNeeded = false;

    objects.forEach(object => {
        if (object.position.distanceTo(camera.position) < 50) {
            shadowUpdateNeeded = true;
        }
    });

    return shadowUpdateNeeded;
}

// 在动画循环中
function animate() {
    if (checkShadowUpdate(shadowCasters, camera)) {
        // 更新阴影
        renderer.shadowMap.needsUpdate = true;
    }
    // ... 其他渲染逻辑
}javascript
class LODShadowSystem {
    constructor() {
        this.lodLevels = [
            { distance: 10, mapSize: 2048 },
            { distance: 30, mapSize: 1024 },
            { distance: 100, mapSize: 512 },
            { distance: Infinity, mapSize: 256 }
        ];
    }

    update(objects, camera) {
        objects.forEach(object => {
            const distance = object.position.distanceTo(camera.position);
            const level = this.lodLevels.find(l => distance < l.distance);

            if (object.shadow && object.shadow.mapSize !== level.mapSize) {
                this.updateObjectShadow(object, level.mapSize);
            }
        });
    }

    updateObjectShadow(object, mapSize) {
        object.traverse(child => {
            if (child.material) {
                // 更新材质或阴影参数
            }
        });
    }
}javascript
// 调整bias值
directionalLight.shadow.bias = -0.0001;

// 或者使用自定义bias函数
function calculateDynamicBias(light, object) {
    const distance = light.position.distanceTo(object.position);
    return -0.0001 * (distance / 100);
}javascript
// 增加贴图分辨率
light.shadow.mapSize.width = 4096;
light.shadow.mapSize.height = 4096;

// 使用软阴影
renderer.shadowMap.type = THREE.PCFSoftShadowMap;
light.shadow.radius = 3;

// 或者使用后处理抗锯齿
const effectFXAA = new THREE.FXAAShader();
const fxaaPass = new THREE.ShaderPass(effectFXAA);
composer.addPass(fxaaPass);javascript
class ShadowPerformanceMonitor {
    constructor() {
        this.timings = [];
    }

    startFrame() {
        this.shadowStart = performance.now();
    }

    endFrame() {
        const shadowTime = performance.now() - this.shadowStart;
        this.timings.push(shadowTime);

        if (this.timings.length > 60) {
            this.timings.shift();
            const avg = this.timings.reduce((a, b) => a + b) / this.timings.length;

            if (avg > 16) { // 超过60FPS预算
                this.optimizeShadows();
            }
        }
    }

    optimizeShadows() {
        // 自动降级阴影质量
        this.reduceShadowQuality();
    }
}按需启用:只对重要物体启用阴影
分辨率分级:根据距离动态调整阴影贴图分辨率
视锥体限制:只渲染可见区域的阴影
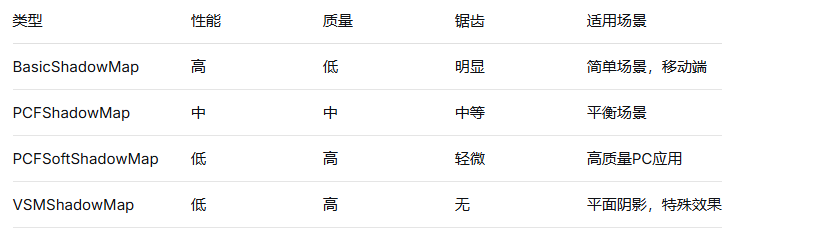
使用合适的类型:根据场景需求选择阴影类型
定期优化:监控性能并动态调整参数
批次处理:合并阴影投射物体减少draw call
通过合理配置和优化,可以在保证视觉效果的同时获得流畅的渲染性能。实际应用中应根据具体场景调整参数,找到质量与性能的最佳平衡点。