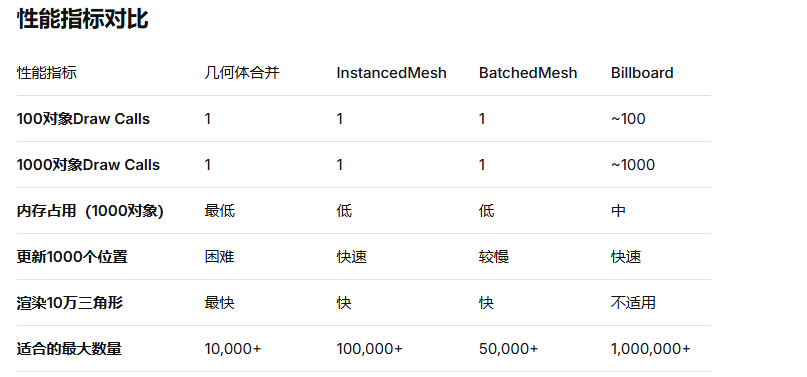
Draw Call 问题:每个独立网格对象都会产生一次渲染调用
内存占用:大量独立对象占用更多内存
GPU 负载:频繁的状态切换降低渲染效率
大幅减少 Draw Call 数量
提升渲染性能,特别是大量相似对象
减少内存占用
javascript
import * as THREE from 'three';
import { BufferGeometryUtils } from 'three/examples/jsm/utils/BufferGeometryUtils.js';

// 创建多个几何体
const geometries = [];
for (let i = 0; i < 100; i++) {
  const geometry = new THREE.BoxGeometry(1, 1, 1);
  geometry.translate(
    Math.random() * 50 - 25,
    Math.random() * 50 - 25,
    Math.random() * 50 - 25
  );
  geometries.push(geometry);
}

// 合并几何体
const mergedGeometry = BufferGeometryUtils.mergeBufferGeometries(geometries);

// 创建材质
const material = new THREE.MeshStandardMaterial({ color: 0x00ff00 });

// 创建网格
const mergedMesh = new THREE.Mesh(mergedGeometry, material);
scene.add(mergedMesh);javascript
// 注意:THREE.Geometry 在 r125+ 已废弃
const mergedGeometry = new THREE.Geometry();

for (let i = 0; i < 100; i++) {
  const box = new THREE.Mesh(
    new THREE.BoxGeometry(1, 1, 1),
    new THREE.MeshBasicMaterial()
  );
  box.position.set(
    Math.random() * 50 - 25,
    Math.random() * 50 - 25,
    Math.random() * 50 - 25
  );
  box.updateMatrix();
  mergedGeometry.merge(box.geometry, box.matrix);
}javascript
const geometry = new THREE.BoxGeometry(1, 1, 1);
const material = new THREE.MeshStandardMaterial({ color: 0x00ff00 });
const count = 1000;

// 创建实例化网格
const instancedMesh = new THREE.InstancedMesh(geometry, material, count);

// 为每个实例设置变换矩阵
const matrix = new THREE.Matrix4();
const position = new THREE.Vector3();
const quaternion = new THREE.Quaternion();
const scale = new THREE.Vector3(1, 1, 1);

for (let i = 0; i < count; i++) {
  position.set(
    Math.random() * 100 - 50,
    Math.random() * 100 - 50,
    Math.random() * 100 - 50
  );

  quaternion.setFromEuler(
    new THREE.Euler(
      Math.random() * Math.PI,
      Math.random() * Math.PI,
      Math.random() * Math.PI
    )
  );

  matrix.compose(position, quaternion, scale);
  instancedMesh.setMatrixAt(i, matrix);
}

// 重要:设置 instanceMatrix 需要更新
instancedMesh.instanceMatrix.needsUpdate = true;
scene.add(instancedMesh);javascript
const instancedMesh = new THREE.InstancedMesh(geometry, material, count);
const color = new THREE.Color();

// 设置每个实例的颜色
for (let i = 0; i < count; i++) {
  color.setHSL(Math.random(), 0.8, 0.6);
  instancedMesh.setColorAt(i, color);
}

if (instancedMesh.instanceColor) {
  instancedMesh.instanceColor.needsUpdate = true;
}javascript
class OptimizedSceneManager {
  constructor() {
    this.nearObjects = new THREE.Group();
    this.farObjects = new THREE.Group();
    this.lodLevels = [];

    this.initLODSystem();
  }

  initLODSystem() {
    // 近处:高细节几何体
    const highDetailGeometry = new THREE.BoxGeometry(1, 1, 1, 10, 10, 10);
    const highDetailMaterial = new THREE.MeshStandardMaterial({
      color: 0xff0000,
      roughness: 0.1,
      metalness: 0.8
    });

    // 远处:低细节几何体(合并)
    const lowDetailGeometry = new THREE.BoxGeometry(1, 1, 1, 2, 2, 2);
    const lowDetailGeometries = this.createInstances(lowDetailGeometry, 500);
    const mergedLowDetailGeometry = BufferGeometryUtils.mergeBufferGeometries(lowDetailGeometries);
    const lowDetailMaterial = new THREE.MeshStandardMaterial({
      color: 0x00ff00,
      flatShading: true
    });

    // 创建LOD对象
    const lod = new THREE.LOD();

    const highDetailMesh = new THREE.Mesh(highDetailGeometry, highDetailMaterial);
    const lowDetailMesh = new THREE.Mesh(mergedLowDetailGeometry, lowDetailMaterial);

    lod.addLevel(highDetailMesh, 0);
    lod.addLevel(lowDetailMesh, 50);

    scene.add(lod);
  }
}javascript
class GeometryBatchManager {
  constructor(maxVertices = 65535) {
    this.maxVertices = maxVertices; // WebGL限制
    this.batches = new Map(); // material -> geometries
  }

  addObject(mesh) {
    const materialKey = this.getMaterialKey(mesh.material);

    if (!this.batches.has(materialKey)) {
      this.batches.set(materialKey, []);
    }

    const batch = this.batches.get(materialKey);
    batch.push(mesh);

    // 检查是否需要分批
    if (this.shouldCreateNewBatch(batch, mesh.geometry)) {
      this.createNewBatch(materialKey);
    }
  }

  getMaterialKey(material) {
    // 根据材质属性生成唯一键
    return JSON.stringify({
      type: material.type,
      color: material.color?.getHex(),
      map: material.map?.uuid
    });
  }

  shouldCreateNewBatch(batch, geometry) {
    let totalVertices = 0;
    for (const mesh of batch) {
      totalVertices += mesh.geometry.attributes.position.count;
    }
    return totalVertices + geometry.attributes.position.count > this.maxVertices;
  }

  finalize() {
    const mergedMeshes = [];

    for (const [materialKey, meshes] of this.batches) {
      const geometries = meshes.map(mesh => {
        const geometry = mesh.geometry.clone();
        geometry.applyMatrix4(mesh.matrixWorld);
        return geometry;
      });

      const mergedGeometry = BufferGeometryUtils.mergeBufferGeometries(geometries);
      const material = meshes[0].material;
      mergedMeshes.push(new THREE.Mesh(mergedGeometry, material));
    }

    return mergedMeshes;
  }
}javascript
class FrustumCulledInstancedMesh extends THREE.InstancedMesh {
  constructor(geometry, material, count) {
    super(geometry, material, count);
    this.visibleInstances = new Array(count).fill(true);
    this.frustumCulled = true;
  }

  updateInstanceVisibility(camera) {
    const frustum = new THREE.Frustum();
    frustum.setFromProjectionMatrix(
      new THREE.Matrix4().multiplyMatrices(
        camera.projectionMatrix,
        camera.matrixWorldInverse
      )
    );

    const sphere = new THREE.Sphere();
    const matrix = new THREE.Matrix4();

    for (let i = 0; i < this.count; i++) {
      this.getMatrixAt(i, matrix);
      sphere.center.setFromMatrixPosition(matrix);
      sphere.radius = 1; // 根据实际几何体大小调整

      this.visibleInstances[i] = frustum.intersectsSphere(sphere);
    }

    this.updateVisibilityAttributes();
  }

  updateVisibilityAttributes() {
    // 可以通过自定义属性或修改颜色实现可见性控制
    // 这里简化处理,实际使用时需要更复杂的实现
  }
}** 大规模场景优化**
javascript
class OptimizedCityScene {
  constructor() {
    this.buildingGeometries = this.createBuildingGeometries();
    this.treeGeometries = this.createTreeGeometries();
    this.roadGeometries = this.createRoadGeometries();

    this.initialize();
  }

  initialize() {
    // 建筑物:使用 InstancedMesh
    const buildingMaterial = new THREE.MeshStandardMaterial({
      color: 0xcccccc,
      roughness: 0.7
    });

    this.buildingMesh = new THREE.InstancedMesh(
      this.buildingGeometries.base,
      buildingMaterial,
      1000
    );

    // 树木:按类型分组合并
    this.treeGroups = this.createTreeGroups();

    // 道路:使用合并几何体
    this.roadMesh = this.createRoadMesh();
  }

  createTreeGroups() {
    const treeTypes = ['pine', 'oak', 'maple'];
    const groups = {};

    treeTypes.forEach(type => {
      const geometries = this.treeGeometries[type];
      const mergedGeometry = BufferGeometryUtils.mergeBufferGeometries(geometries);
      const material = this.createTreeMaterial(type);
      groups[type] = new THREE.Mesh(mergedGeometry, material);
    });

    return groups;
  }

  update(camera) {
    // 动态LOD更新
    this.updateLOD(camera);

    // 视锥体剔除
    if (this.buildingMesh instanceof FrustumCulledInstancedMesh) {
      this.buildingMesh.updateInstanceVisibility(camera);
    }
  }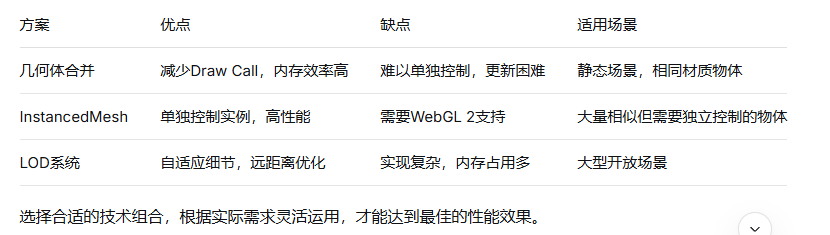
}何时使用几何体合并
✅ 大量静态、相同材质的物体
✅ 不需要单独控制的物体
✅ 性能是关键因素的场景
何时使用 InstancedMesh
✅ 需要单独控制位置/旋转/缩放
✅ 需要单独控制颜色
✅ 物体数量非常多(数千+)
✅ 需要动态更新实例属性
javascript
function monitorPerformance(renderer) {
  const info = renderer.info;

  console.log({
    memory: info.memory,
    render: {
      calls: info.render.calls,
      triangles: info.render.triangles,
      points: info.render.points,
      lines: info.render.lines
    }
  });

  // 监控帧率
  stats = new Stats();
  document.body.appendChild(stats.dom);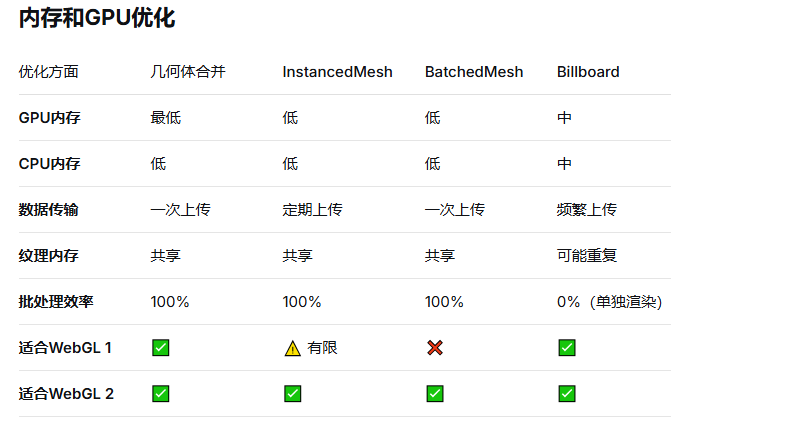
}顶点数限制:单次Draw Call最多65535个顶点(使用Uint16)
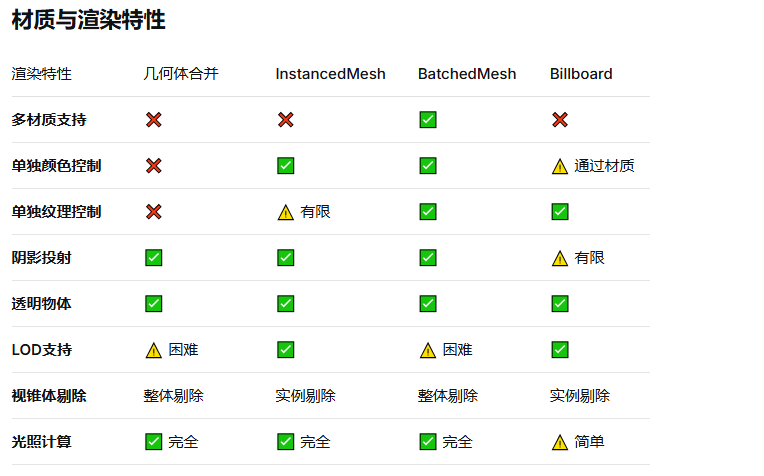
材质限制:合并的几何体必须使用相同材质
内存管理:及时dispose不需要的几何体
更新频率:合并后的几何体难以动态更新
纹理坐标:确保合并后的UV坐标正确
BatchedMesh 是 Three.js 提供的一个高级网格类,专门用于优化大量相似对象的渲染。它基于 多绘制(Multi-Draw) 技术,将多个几何体打包到单个网格中,同时保持材质的多样性。
javascript
import { BatchedMesh } from 'three/addons/objects/BatchedMesh.js';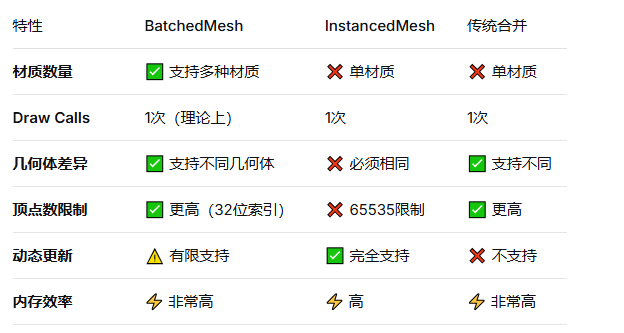
多材质支持(关键优势)
javascript
// 创建 BatchedMesh
const maxGeometryCount = 100;
const maxVertexCount = 100000;
const maxIndexCount = maxVertexCount * 1.5;

const batchedMesh = new BatchedMesh(
  maxGeometryCount,
  maxVertexCount,
  maxIndexCount,
  scene // 可选,用于材质引用
);

// 添加不同材质的几何体
const materials = [
  new THREE.MeshBasicMaterial({ color: 0xff0000 }),
  new THREE.MeshBasicMaterial({ color: 0x00ff00 }),
  new THREE.MeshBasicMaterial({ color: 0x0000ff })
];

// 为每个子几何体分配材质
for (let i = 0; i < 50; i++) {
  const geometry = new THREE.BoxGeometry(1, 1, 1);
  const materialIndex = i % materials.length; // 循环使用不同材质

  const batchId = batchedMesh.addGeometry(geometry, materials[materialIndex]);

  // 设置变换
  const matrix = new THREE.Matrix4().makeTranslation(
    Math.random() * 100 - 50,
    Math.random() * 100 - 50,
    Math.random() * 100 - 50
  );

  batchedMesh.setMatrixAt(batchId, matrix);
}javascript
// 突破65535顶点限制
const batchedMesh = new BatchedMesh(
  1000,      // 最大几何体数量
  500000,    // 最大顶点数(远超65535)
  1000000,   // 最大索引数
  scene
);

// 可以添加非常复杂的几何体
const complexGeometry = new THREE.SphereGeometry(1, 64, 64); // 约8000个顶点javascript
// BatchedMesh 使用紧凑的存储格式
class MemoryOptimizedBatchedMesh extends BatchedMesh {
  constructor() {
    super(1000, 100000, 150000);

    // 内部存储结构:
    // - 单一顶点缓冲区
    // - 单一索引缓冲区
    // - 材质引用数组
    // - 变换矩阵数组
  }
}场景一:游戏中的建筑群
javascript
class GameCity {
  constructor() {
    this.batchedMesh = new BatchedMesh(500, 200000, 300000);
    this.buildingTypes = this.createBuildingTypes();
    this.initCity();
  }

  createBuildingTypes() {
    // 不同类型的建筑使用不同材质
    return {
      residential: {
        geometry: this.createResidentialGeometry(),
        materials: [
          new THREE.MeshStandardMaterial({ color: 0xf0e68c }), // 米色
          new THREE.MeshStandardMaterial({ color: 0xd3d3d3 }), // 灰色
        ]
      },
      commercial: {
        geometry: this.createCommercialGeometry(),
        materials: [
          new THREE.MeshStandardMaterial({ color: 0x87ceeb }), // 天蓝
          new THREE.MeshStandardMaterial({ color: 0xffd700 }), // 金色
        ]
      }
    };
  }

  initCity() {
    // 生成1000个建筑,使用不同材质
    for (let i = 0; i < 1000; i++) {
      const type = Math.random() > 0.5 ? 'residential' : 'commercial';
      const building = this.buildingTypes[type];
      const materialIndex = Math.floor(Math.random() * building.materials.length);

      const batchId = this.batchedMesh.addGeometry(
        building.geometry,
        building.materials[materialIndex]
      );

      // 随机位置和大小
      const matrix = new THREE.Matrix4()
        .makeScale(
          0.5 + Math.random() * 2,
          1 + Math.random() * 10,
          0.5 + Math.random() * 2
        )
        .setPosition(
          Math.random() * 200 - 100,
          0,
          Math.random() * 200 - 100
        );

      this.batchedMesh.setMatrixAt(batchId, matrix);
    }

    scene.add(this.batchedMesh);
  }
}
场景二:植被系统
javascript
class VegetationSystem {
  constructor() {
    this.batchedMesh = new BatchedMesh(2000, 300000, 450000);
    this.plantTypes = this.createPlantTypes();
    this.populateTerrain();
  }

  createPlantTypes() {
    return {
      tree: {
        geometries: this.createTreeGeometries(), // LOD几何体数组
        materials: [
          this.createLeafMaterial(),
          this.createBarkMaterial()
        ]
      },
      bush: {
        geometries: this.createBushGeometry(),
        materials: [this.createBushMaterial()]
      },
      grass: {
        geometries: this.createGrassGeometry(),
        materials: [this.createGrassMaterial()]
      }
    };
  }

  populateTerrain() {
    const terrainSize = 1000;
    const density = 0.01; // 植物密度

    for (let x = -terrainSize/2; x < terrainSize/2; x += 10) {
      for (let z = -terrainSize/2; z < terrainSize/2; z += 10) {
        if (Math.random() < density) {
          this.addPlant(x, z);
        }
      }
    }
  }

  addPlant(x, z) {
    const plantType = this.getPlantTypeForLocation(x, z);
    const plant = this.plantTypes[plantType];

    // 选择LOD级别
    const lodLevel = this.calculateLODLevel(x, z);
    const geometry = plant.geometries[lodLevel];

    const batchId = this.batchedMesh.addGeometry(
      geometry,
      plant.materials[Math.floor(Math.random() * plant.materials.length)]
    );

    // 随机变换
    const scale = 0.8 + Math.random() * 0.4;
    const rotationY = Math.random() * Math.PI * 2;

    const matrix = new THREE.Matrix4()
      .makeRotationY(rotationY)
      .scale(new THREE.Vector3(scale, scale, scale))
      .setPosition(x, this.getTerrainHeight(x, z), z);

    this.batchedMesh.setMatrixAt(batchId, matrix);
  }
}
UI/信息可视化
javascript
class DataVisualization3D {
  constructor(dataPoints) {
    this.batchedMesh = new BatchedMesh(
      dataPoints.length,
      100000,
      150000
    );
    this.colorMap = this.createColorMap();
    this.visualizeData(dataPoints);
  }

  createColorMap() {
    // 根据数据值创建渐变色材质
    const colors = [
      new THREE.Color(0x0000ff), // 低值 - 蓝色
      new THREE.Color(0x00ff00), // 中值 - 绿色
      new THREE.Color(0xff0000)  // 高值 - 红色
    ];

    return colors.map(color =>
      new THREE.MeshBasicMaterial({ color })
    );
  }

  visualizeData(dataPoints) {
    dataPoints.forEach((data, index) => {
      // 根据数据类型选择几何体
      const geometry = this.getGeometryForDataType(data.type);

      // 根据数值选择材质
      const materialIndex = Math.floor(
        (data.value - data.min) / (data.max - data.min) * this.colorMap.length
      );

      const batchId = this.batchedMesh.addGeometry(
        geometry,
        this.colorMap[materialIndex]
      );

      // 设置位置和大小(基于数据值)
      const height = data.value * 10;
      const matrix = new THREE.Matrix4()
        .makeScale(1, height, 1)
        .setPosition(data.x, height/2, data.z);

      this.batchedMesh.setMatrixAt(batchId, matrix);
    });
  }
}javascript
class BatchedMeshPerformanceMonitor {
  constructor(batchedMesh) {
    this.batchedMesh = batchedMesh;
    this.stats = {
      drawCalls: 0,
      triangleCount: 0,
      materialSwitches: 0
    };
  }

  logPerformance() {
    const info = this.batchedMesh.info;

    console.log('BatchedMesh 性能统计:');
    console.log('几何体数量:', info.geometryCount);
    console.log('顶点总数:', info.totalVertexCount);
    console.log('索引总数:', info.totalIndexCount);
    console.log('材质数量:', info.materialCount);
    console.log('内存使用(估算):', this.calculateMemoryUsage(), 'MB');

    // 对比传统方式
    const traditionalDrawCalls = info.geometryCount;
    console.log('传统方式 Draw Calls:', traditionalDrawCalls);
    console.log('BatchedMesh Draw Calls:', 1); // 理想情况
  }

  calculateMemoryUsage() {
    const info = this.batchedMesh.info;
    // 估算内存:顶点数据 + 索引数据 + 矩阵数据
    const vertexMemory = info.totalVertexCount * 32; // 每个顶点约32字节
    const indexMemory = info.totalIndexCount * 4;    // 每个索引4字节
    const matrixMemory = info.geometryCount * 64;    // 每个矩阵64字节

    return ((vertexMemory + indexMemory + matrixMemory) / 1024 / 1024).toFixed(2);
  }
}适用条件
javascript
// ✅ 推荐使用 BatchedMesh 的条件:
const shouldUseBatchedMesh = (
  objectCount > 100 &&                    // 对象数量多
  materialCount > 1 &&                    // 需要多种材质
  geometriesAreSimilar &&                 // 几何体相似但不完全相同
  !needsIndividualAnimation &&            // 不需要单独动画
  isPerformanceCritical                  // 性能是关键
);javascript
class BatchedMeshWithLimitations {
  constructor() {
    // 限制1:动态更新困难
    this.solutions = {
      // 解决方案:分批次更新
      batchUpdates: () => {
        // 标记需要更新的批次
        this.dirtyBatches = new Set();

        // 定期批量更新
        setInterval(() => {
          if (this.dirtyBatches.size > 0) {
            this.batchedMesh.frustumCulled = false;
            this.updateDirtyBatches();
            this.batchedMesh.frustumCulled = true;
          }
        }, 100); // 每100ms更新一次
      },

      // 解决方案2:动态和静态分离
      dynamicStaticSeparation: () => {
        this.staticBatchedMesh = new BatchedMesh(...); // 静态对象
        this.dynamicObjects = new THREE.Group();       // 动态对象
        this.dynamicInstancedMeshes = new Map();       // 动态实例化网格
      }
    };
  }

  // 限制2:剔除优化
  optimizeCulling() {
    // BatchedMesh 不支持单独剔除
    // 解决方案:按区域分组
    const gridSize = 100;
    this.gridBatches = new Map();

    // 将对象分配到网格单元
    objects.forEach(obj => {
      const gridKey = `${Math.floor(obj.x/gridSize)},${Math.floor(obj.z/gridSize)}`;

      if (!this.gridBatches.has(gridKey)) {
        this.gridBatches.set(gridKey, new BatchedMesh(...));
      }

      this.gridBatches.get(gridKey).addObject(obj);
    });
  }
}javascript
class BatchedMeshLODSystem {
  constructor() {
    this.lodLevels = [0, 1, 2]; // 0=高,1=中,2=低
    this.batchesByLOD = new Map();

    this.lodLevels.forEach(level => {
      this.batchesByLOD.set(level, new BatchedMesh(...));
    });

    this.cameraPosition = new THREE.Vector3();
  }

  update(camera) {
    camera.getWorldPosition(this.cameraPosition);

    // 更新每个批次的可见性
    this.objects.forEach(obj => {
      const distance = obj.position.distanceTo(this.cameraPosition);
      const lodLevel = this.getLODLevel(distance);

      if (obj.currentLOD !== lodLevel) {
        this.moveToLODBatch(obj, lodLevel);
      }
    });
  }

  moveToLODBatch(object, targetLOD) {
    // 从当前批次移除
    if (object.batchId !== undefined) {
      const currentBatch = this.batchesByLOD.get(object.currentLOD);
      currentBatch.deleteGeometry(object.batchId);
    }

    // 添加到新批次
    const targetBatch = this.batchesByLOD.get(targetLOD);
    object.batchId = targetBatch.addGeometry(
      object.geometries[targetLOD],
      object.material
    );

    object.currentLOD = targetLOD;
  }
}javascript
class CulledBatchedMesh extends BatchedMesh {
  constructor(maxGeometryCount, maxVertexCount, maxIndexCount, scene) {
    super(maxGeometryCount, maxVertexCount, maxIndexCount, scene);

    // 自定义剔除系统
    this.visibilityArray = new Float32Array(maxGeometryCount).fill(1);
    this.setupVisibilityBuffer();
  }

  setupVisibilityBuffer() {
    // 创建可见性属性缓冲区
    const visibilityAttribute = new THREE.InstancedBufferAttribute(
      this.visibilityArray,
      1
    );

    this.setAttribute('visibility', visibilityAttribute);
  }

  updateVisibility(camera) {
    const frustum = new THREE.Frustum();
    frustum.setFromProjectionMatrix(
      new THREE.Matrix4().multiplyMatrices(
        camera.projectionMatrix,
        camera.matrixWorldInverse
      )
    );

    const matrix = new THREE.Matrix4();
    const sphere = new THREE.Sphere();
    sphere.radius = 1; // 根据实际调整

    for (let i = 0; i < this.geometryCount; i++) {
      this.getMatrixAt(i, matrix);
      sphere.center.setFromMatrixPosition(matrix);

      this.visibilityArray[i] = frustum.intersectsSphere(sphere) ? 1 : 0;
    }

    this.getAttribute('visibility').needsUpdate = true;
  }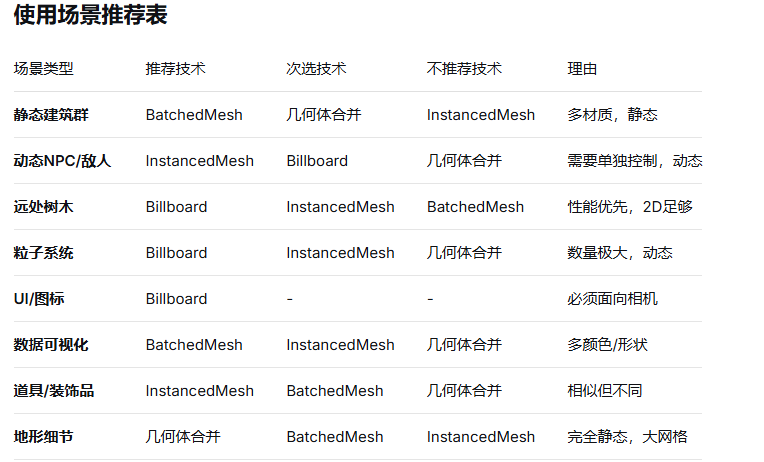
}大型静态场景
建筑群、城市景观
自然景观(树木、岩石)
室内装饰品
需要材质多样性的场景
不同类型的地形
彩色数据可视化
游戏中的道具系统
性能关键的应用
WebGL 性能要求高的应用
VR/AR 应用
大规模数据展示
javascript
function chooseOptimizationStrategy(sceneAnalysis) {
  const {
    objectCount,
    materialCount,
    needsAnimation,
    vertexCount
  } = sceneAnalysis;

  if (objectCount < 100) {
    return '传统单个网格'; // 不需要优化
  }

  if (materialCount === 1 && !needsAnimation) {
    if (vertexCount < 65535) {
      return '几何体合并';
    } else {
      return 'InstancedMesh';
    }
  }

  if (materialCount > 1 && !needsAnimation) {
    return 'BatchedMesh'; // 最佳选择
  }

  if (needsAnimation) {
    return 'InstancedMesh + 动态更新';
  }

  return '混合方案:BatchedMesh + InstancedMesh';
}javascript
// Billboard 基础实现
class BillboardSystem {
  constructor() {
    this.billboards = new THREE.Group();
    this.createBillboardSprites();
  }

  createBillboardSprites() {
    // 方法1:使用 Sprite
    const texture = new THREE.TextureLoader().load('tree.png');
    const spriteMaterial = new THREE.SpriteMaterial({ map: texture });

    for (let i = 0; i < 100; i++) {
      const sprite = new THREE.Sprite(spriteMaterial);
      sprite.position.set(
        Math.random() * 100 - 50,
        Math.random() * 100 - 50,
        Math.random() * 100 - 50
      );
      sprite.scale.set(5, 5, 1);
      this.billboards.add(sprite);
    }

    // 方法2:使用 Billboard 特性的 Mesh
    const geometry = new THREE.PlaneGeometry(1, 1);
    const material = new THREE.MeshBasicMaterial({
      map: texture,
      transparent: true,
      side: THREE.DoubleSide
    });

    const billboardMesh = new THREE.Mesh(geometry, material);
    // 在渲染循环中手动更新朝向
  }

  update(camera) {
    // 更新所有 Sprite 朝向相机
    this.billboards.children.forEach(sprite => {
      sprite.lookAt(camera.position);
    });
  }
}推荐使用 Billboard 的场景
javascript
class BillboardUseCases {
  // 场景1:植被系统(树木、草地)
  createVegetationBillboards() {
    const treeGroup = new THREE.Group();

    // 使用不同角度的树木贴图实现伪3D
    const treeTextures = [
      this.loadTexture('tree_front.png'),
      this.loadTexture('tree_back.png'),
      this.loadTexture('tree_side.png')
    ];

    for (let i = 0; i < 1000; i++) {
      // 创建交叉的两个平面
      const tree = this.createCrossBillboard(treeTextures);
      tree.position.set(
        Math.random() * 500 - 250,
        0,
        Math.random() * 500 - 250
      );
      treeGroup.add(tree);
    }

    // 优势:
    // ✅ 远看效果逼真
    // ✅ 性能开销低
    // ✅ 易于实现LOD
  }

  // 场景2:粒子效果
  createParticleBillboards() {
    const particleCount = 10000;
    const particleGroup = new THREE.Group();

    const particleTexture = this.createCircleTexture();
    const material = new THREE.SpriteMaterial({
      map: particleTexture,
      transparent: true,
      opacity: 0.7,
      blending: THREE.AdditiveBlending
    });

    for (let i = 0; i < particleCount; i++) {
      const sprite = new THREE.Sprite(material);
      sprite.position.set(
        Math.random() * 200 - 100,
        Math.random() * 200 - 100,
        Math.random() * 200 - 100
      );
      sprite.scale.setScalar(0.1 + Math.random() * 0.2);
      particleGroup.add(sprite);
    }

    // 优势:
    // ✅ 数量极大时性能好
    // ✅ 易于动态更新
    // ✅ 支持各种混合效果
  }

  // 场景3:UI元素和图标
  createUIBillboards() {
    const iconGroup = new THREE.Group();

    // 在3D场景中显示2D图标
    const icons = ['health', 'ammo', 'map', 'quest'];

    icons.forEach((iconType, index) => {
      const texture = this.loadTexture(`${iconType}_icon.png`);
      const sprite = new THREE.Sprite(
        new THREE.SpriteMaterial({ map: texture })
      );

      sprite.position.set(index * 2 - 3, 5, -10);
      sprite.scale.set(1, 1, 1);
      iconGroup.add(sprite);
    });

    // 优势:
    // ✅ 始终面向相机
    // ✅ 2D图像显示清晰
    // ✅ 易于屏幕空间定位
  }
}LOD系统中的混合使用
javascript
class HybridLODSystem {
  constructor() {
    this.nearObjects = new BatchedMesh(200, 50000, 75000);  // 近处:3D模型
    this.midObjects = new BatchedMesh(500, 30000, 45000);   // 中距离:简化模型
    this.farObjects = new THREE.Group();                    // 远处:Billboard

    this.setupLOD();
  }

  setupLOD() {
    // LOD级别定义
    this.lodDistances = {
      near: 50,   // 0-50单位:高细节
      mid: 150,   // 50-150单位:中细节
      far: 500    // 150+单位:Billboard
    };
  }

  addObject(object) {
    // 根据距离选择LOD策略
    const distance = this.calculateDistanceToCamera(object);

    if (distance < this.lodDistances.near) {
      this.addToNearBatch(object);
    } else if (distance < this.lodDistances.mid) {
      this.addToMidBatch(object);
    } else {
      this.addToFarBillboard(object);
    }
  }

  addToFarBillboard(object) {
    // 创建Billboard替代品
    const texture = this.createBillboardTexture(object);
    const sprite = new THREE.Sprite(
      new THREE.SpriteMaterial({ map: texture })
    );

    sprite.position.copy(object.position);
    sprite.scale.set(object.size * 2, object.size * 2, 1);

    this.farObjects.add(sprite);
  }

  updateLOD(cameraPosition) {
    // 动态更新LOD级别
    this.objects.forEach(object => {
      const newDistance = object.position.distanceTo(cameraPosition);
      const currentLOD = object.currentLOD;
      const targetLOD = this.getLODLevel(newDistance);

      if (currentLOD !== targetLOD) {
        this.moveObjectToLOD(object, targetLOD);
      }
    });
  }
}javascript
class DynamicStaticSeparation {
  constructor() {
    // 静态对象:使用 BatchedMesh
    this.staticBatch = new BatchedMesh(1000, 200000, 300000);

    // 动态对象:使用 Billboard(如果需要面向相机)
    this.dynamicBillboards = new THREE.Group();

    // 或使用 InstancedMesh(如果需要3D但动态)
    this.dynamicInstanced = new Map();

    this.setupScene();
  }

  setupScene() {
    // 静态环境:建筑、地形
    this.createStaticEnvironment();

    // 动态元素:NPC、车辆、特效
    this.createDynamicElements();
  }

  createStaticEnvironment() {
    // 使用 BatchedMesh 合并所有静态对象
    const staticObjects = this.getAllStaticObjects();

    staticObjects.forEach(obj => {
      const batchId = this.staticBatch.addGeometry(
        obj.geometry,
        obj.material
      );

      this.staticBatch.setMatrixAt(batchId, obj.matrix);
    });
  }

  createDynamicElements() {
    // NPC:使用Billboard(如果从远处看)
    this.createNPCBillboards();

    // 车辆:使用InstancedMesh(需要3D效果)
    this.createVehicleInstances();

    // 特效:使用粒子系统(Billboard)
    this.createEffectParticles();
  }

  createNPCBillboards() {
    // 为每个NPC创建Billboard
    this.npcs.forEach(npc => {
      const texture = this.getNPCTexture(npc.type);
      const sprite = new THREE.Sprite(
        new THREE.SpriteMaterial({ map: texture })
      );

      sprite.position.copy(npc.position);
      this.dynamicBillboards.add(sprite);
      npc.sprite = sprite;
    });
  }

  updateDynamicElements(deltaTime) {
    // 更新Billboard位置和朝向
    this.npcs.forEach(npc => {
      // 更新位置
      npc.sprite.position.add(npc.velocity.clone().multiplyScalar(deltaTime));

      // Billboard自动面向相机,无需手动更新朝向
    });
  }
}** Billboard 优化技巧**
javascript
class BillboardOptimization {
  constructor() {
    this.optimizedBillboards = this.createOptimizedBillboards();
  }

  createOptimizedBillboards() {
    // 优化1:使用共享材质
    const sharedMaterial = new THREE.SpriteMaterial({
      map: this.createAtlasTexture(),
      transparent: true
    });

    // 优化2:按距离分组
    const billboardGroups = {
      near: new THREE.Group(),
      mid: new THREE.Group(),
      far: new THREE.Group()
    };

    // 优化3:视锥体剔除
    this.setupFrustumCulling(billboardGroups);

    // 优化4:LOD纹理
    this.setupTextureLOD();

    return billboardGroups;
  }

  setupTextureLOD() {
    // 为不同距离使用不同分辨率的纹理
    this.textureLOD = {
      high: this.loadTexture('tree_high.png'),   // 2048x2048
      medium: this.loadTexture('tree_med.png'),  // 1024x1024
      low: this.loadTexture('tree_low.png')      // 512x512
    };
  }
}javascript
// 决策函数:根据需求选择技术
function chooseTechnique(requirements) {
  const {
    objectCount,
    needs3DGeometry,
    materialVariety,
    needsDynamicUpdate,
    cameraFacingRequired,
    performanceCritical
  } = requirements;

  // 决策流程
  if (cameraFacingRequired && !needs3DGeometry) {
    // 需要面向相机且不需要3D几何体
    return {
      technique: 'Billboard',
      reason: '最适合始终面向相机的2D元素',
      implementation: 'THREE.Sprite 或手动朝向的 Plane'
    };
  }

  if (objectCount > 1000 && materialVariety > 1) {
    // 大量对象且需要多种材质
    return {
      technique: 'BatchedMesh',
      reason: '高效处理大量多材质对象',
      implementation: 'THREE.BatchedMesh'
    };
  }

  if (needsDynamicUpdate && objectCount > 100) {
    // 需要动态更新且对象较多
    if (cameraFacingRequired) {
      return {
        technique: 'Billboard',
        reason: '动态更新性能更好',
        implementation: 'THREE.Sprite'
      };
    } else {
      return {
        technique: 'InstancedMesh',
        reason: '支持动态更新的3D对象',
        implementation: 'THREE.InstancedMesh'
      };
    }
  }

  if (needs3DGeometry && performanceCritical) {
    // 需要3D几何体且性能关键
    if (materialVariety === 1) {
      return {
        technique: 'InstancedMesh',
        reason: '单材质3D对象的最佳性能',
        implementation: 'THREE.InstancedMesh'
      };
    } else {
      return {
        technique: 'BatchedMesh',
        reason: '多材质3D对象的性能优化',
        implementation: 'THREE.BatchedMesh'
      };
    }
  }

  // 默认:传统单个Mesh
  return {
    technique: 'Individual Meshes',
    reason: '对象数量少,简单直接',
    implementation: '多个 THREE.Mesh'
  };
}

// 使用示例
const myRequirements = {
  objectCount: 500,
  needs3DGeometry: false,
  materialVariety: 1,
  needsDynamicUpdate: true,
  cameraFacingRequired: true,
  performanceCritical: true
};

const decision = chooseTechnique(myRequirements);
console.log(decision);Billboard 优势:
始终面向相机,适合UI、粒子、远处物体
CPU开销低,易于动态更新
适合大量简单2D元素
2D元素:Billboard
javascript
class PerformanceMonitor {
  constructor() {
    this.monitorTechniques();
  }

  monitorTechniques() {
    // 监控不同技术的性能
    setInterval(() => {
      const renderInfo = renderer.info.render;

      console.table({
        'Draw Calls': renderInfo.calls,
        'Triangles': renderInfo.triangles,
        'Textures': renderInfo.textures,
        'Geometries': renderInfo.geometries,
        'Frame Time': this.getFrameTime()
      });
    }, 1000);
  }

  compareTechniques(techniqueA, techniqueB) {
    // A/B测试不同技术
    return {
      'Draw Call减少': `${((techniqueA.calls - techniqueB.calls) / techniqueA.calls * 100).toFixed(1)}%`,
      '内存减少': `${((techniqueA.memory - techniqueB.memory) / techniqueA.memory * 100).toFixed(1)}%`,
      '帧率提升': `${((techniqueB.fps - techniqueA.fps) / techniqueA.fps * 100).toFixed(1)}%`
    };
  }
}
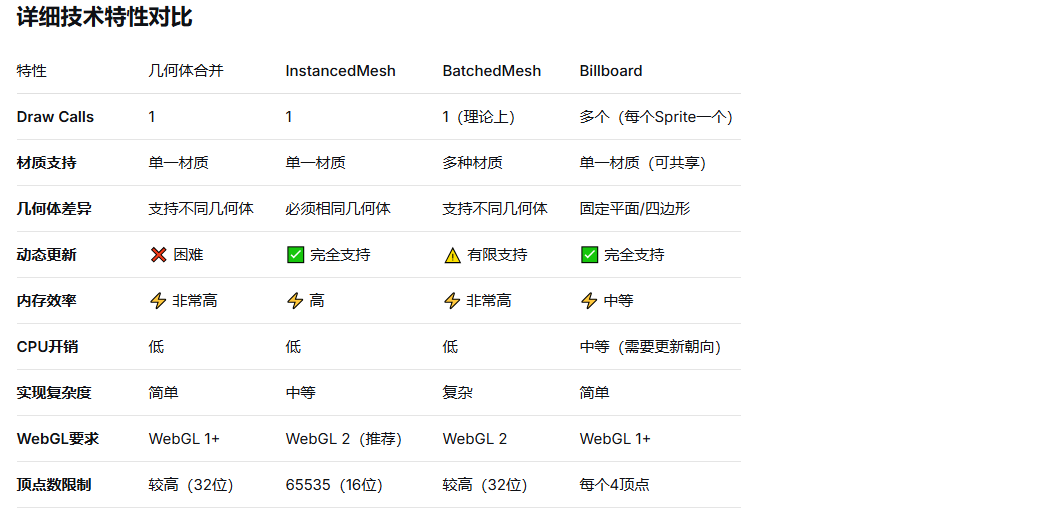
物体完全静态,不会移动
所有物体使用相同材质
物体数量中等(< 10,000)
需要最简单的实现
物体需要单独控制(位置、旋转、颜色)
所有物体几何形状相同
使用单一材质
物体数量非常多(> 1,000)
物体使用多种不同材质
物体几何形状不同
物体基本静态
追求最佳性能(Draw Call最少)
物体需要始终面向相机
使用2D图像足够表现
物体数量极大(> 10,000)
需要频繁动态更新